Project: Build your own brooder box

If you are hatching chicks in an incubator you are going to need somewhere for them to go when they pop out of the shell. Brooder boxes are simple affairs that just need to provide a warm, safe, draught free environment for the crucial first few weeks of life.
You can buy brooders but if you only intend to hatch a few birds you can make a simple DIY alternative from easily sourced materials for just a few pounds. The basis of this one is a clear plastic storage box (with lid) that can be found at your local home store or online. I would suggest a minimum box height of 30cm (12″) but the one used in this project is 38cm (15″) for extra security. Internal dimensions are 70cm (28″) x 30cm (12″) but anything that amounts to about this is fine for approx 6-12 chicks depending on breed.
Build time:
Quick: 15-30 minutes
Difficulty:
Easy
Materials:
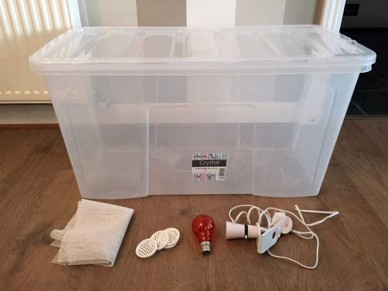
(see main pic)
Large clear plastic storage box
Angled lamp holder
60W fire glow bulb
Nut and bolt
4 air vents (Vivarium type) – optional
Anti-slip mat – optional
Tools:
Drill
Hacksaw blade
Hole cutter drill bit – optional
Method

1. Cut holes for the air vents equally spaced around the upper half of the box. You can do this with a hacksaw blade but it’s both quicker and neater using a hole cutter bit of the appropriate size. I used plastic, push in vents, of the types that are found in vivariums. These required a 50mm hole and can be found very cheaply on the internet or at you local supplier. You could, of course, just drill holes around the top of the box if you prefer.

The vents positioned safely at the top of the box

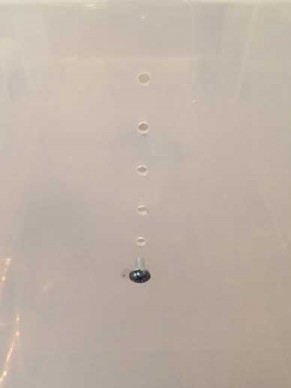
2. Drill holes at 1 inch interval at one end of the box to allow you to fix your bulb holder at differing heights. You will need to raise the bulb up as the chicks develop and grow. I found this clamp on model that provides a good angle and has a mounting hole already included in the design. The bulb holder is secured with a small nut and bolt

3. Cut a slot for the cable to sit in allowing the lid to fit flush.

4. Cut your anti-slip mat to size. You can use dust-extracted wood shaving or sand instead of the anti-slip mat but, whatever you use, the floor needs to offer enough grip to avoid the chicks suffering from splayed leg.

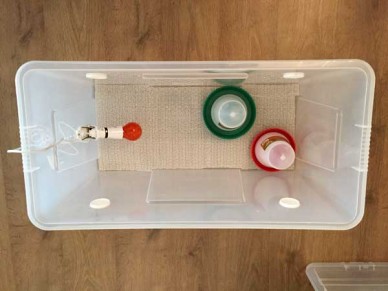
There you have it, a perfect, easy to clean, brooding box. Depending on what you are hatching you may need to move your chicks to a larger container as they grow but, with the addition of a chick feeder and drinker, this is all you need to give them a great start.
Poultry categories
Most recent Poultry articles
- Preventing egg laying problems in older hens with implants 15th March, 2017
- Integrating new chickens into an existing flock 15th May, 2016
- The nests in my heart – a personal view of ex-battery hens 22nd March, 2016
- Chicken FAQ: your most common chicken keeping questions answered 19th January, 2016
- Hens and herbs – no this is not a chicken recipe 08th October, 2015
- Feeding chickens: a balanced diet for backyard hens 16th April, 2015


Leave a reply