Craft project: DIY bottle cap tambourine

Music and making music is something that we can all enjoy and you don’t have to spend a fortune on instruments to start making the the right noises. Over the next few weeks I am going to look at some popular traditional handmade instruments and how you can rustle up an orchestra for pennies.
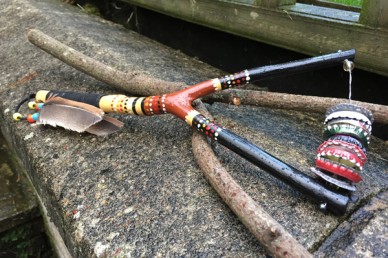
The tambourine is a stalwart of the rhythm section and as popular today as it ever has been. This take on the instrument is a departure from the more iconic round shape that automatically comes to mind but is easy to make, can be decorated as simply or ostentatiously as you like, and sounds surprisingly authentic.

Materials
Suitable V-shaped stick from a fallen tree or branch
10-15 bottle caps
Thin garden wire
Optional decorative items such as paint, material, feathers and beads
Tools
Drill
Optional tools depending on finishing
Sand paper
Hammer and suitable nail
Pliers
Method
Find a stick from a fallen tree or branch that has an even V with enough material for a handle. The one in the picture is approximately 33cm long overall with a handle of around 19cm. Diameter of the handle is 18mm and the V section arms 12mm. Distance across the inner span of the V is 12cm. Avoid rotten or brittle wood as it needs to support a taught wire.
If you are going to paint your tambourine it is best to strip the bark back to the wood. Make sure it’s dried out then sand down with medium grit paper to remove any remnants of bark, smooth the surface and ensure that there is a key for the paint.

The stick trimmed to size, sanded and ready for painting
Drill a small hole at the top of each arm of the V about 1 cm from the top. Ensure that the holes are horizontal so that the wire can be threaded through straight. You can also drill a slightly larger hole at the bottom of the handle if you’d like to add a carry cord or other decoration. Add a shallow countersink to each hole.
You can of course leave the stick in its natural form complete with bark coating but, if you want to add some colour, acrylic paint will produce a nice finish. I applied a watered down layer (much as you would on fresh plaster) to seal the surface and provide a stable base for the colour.

Finish with a coat of varnish to protect the painted design.
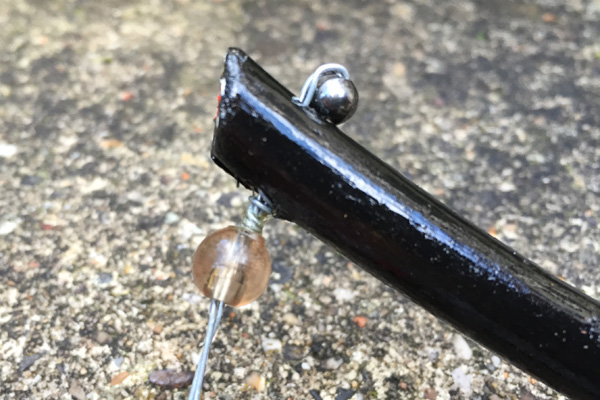
Cut enough wire to span the V when doubled up with some left over to secure it. You could just form a loop, feed it through the hole in one of the arms and then feed the cut ends through (see pic) but I fed the wire through a small metal bead before feeding the wire through the hole – this stops the wire cutting into the wood and/or the paint job.

Using beads helps to protect the painted surface of your tambourine
Make a small hole through the centre of each bottle cap with a drill or nail. Note: Drill through into some scrap wood to stop sharp burs forming. Flatten some of the caps and thread them onto the wire in random order and orientation.

Flattening some of caps helps produce a better sound
Finish off by threading the wire through the hole in the other arm of the V and securing either by wrapping around the arm and securing the wire around itself, as shown below, or by using another bead.
I also positioned and glued plastic beads on the inside of the V arms to protect them for collision with the caps and to hide the ends of the wire.

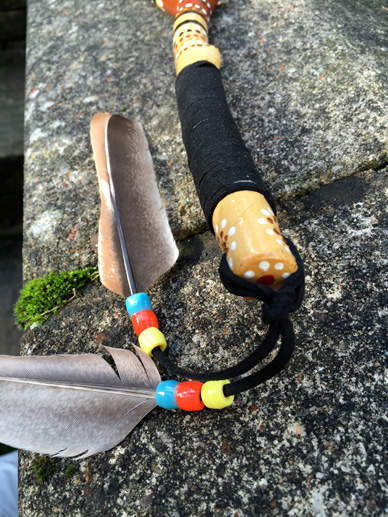
A leather grip and some feathers finishes the tambourine off nicely
At this point you can add other decorative elements you wish. I wound some leather thong down the handle to form a grip and added some feathers to produce a pleasing mash up of Aboriginal and Native American designs.
That’s it. The rhythm is in your hands…..
Also in this series: Bamboo flute and coconut shell maracas
Crafts categories
Most recent Crafts articles
- Paracord weaving: make a survival bracelet 17th January, 2015
- Picture tutorial: Make a PVC pipe bow 03rd January, 2015
- Shake it up – handmade coconut shell maracas 05th November, 2014
- Craft Project: Handmade Bamboo Flute 30th October, 2014
- Craft project: DIY bottle cap tambourine 21st October, 2014
- Project: Making a CD drop spindle 24th April, 2014


Leave a reply